Creating a new Product in your store front will be one of the most common actions you will do outside of managing your orders. It really isn’t that hard and if you mess up just go back and correct the mistake, or worse case just trash it and make a new one.
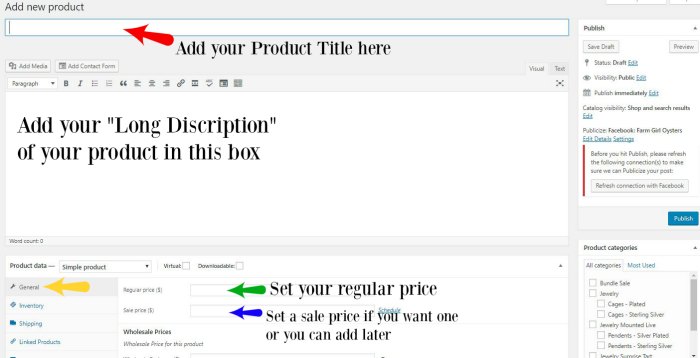
In your dashboard, on the left hand side hover over Products then click on Add New.

In the above image:
Red Arrow – Add your Product Title
Yellow Arrow – Your General Product Data Tab
Green Arrow – Set the regular or retail price of your item
Blue Arrow – Set a sale price – You can come back to this product at a later time and update this to show a sale when you are ready
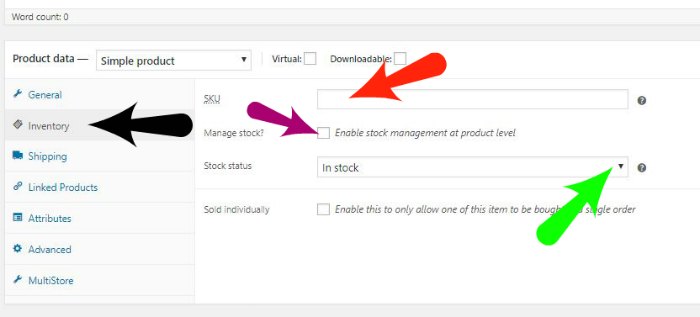
Your next step in creating your new product is easy. If you plan on keeping stock inventory then follow the steps and colored arrows in the image below. If you dont plan on keeping inventory on this particular product then skip to the next step.
Setting Inventory

Black Arrow – Click on the Inventory Tab
Red Arrow – Set your SKU or stock number here to help you keep track of your inventory
Purple Arrow – Click the box to actually keep track of stock
Green Arrow – Chose your option on how to notify your customers
One of the final settings to set is the Shipping. Don’t worry it is still getting easier. Check out the below image and colored arrows for instructions
Setting Shipping

Black Arrow – Click on the Shipping tab
Red Arrow – Enter the weight in Ounces
Blue Arrow – Enter the Length then Width and Height
That’s all you need to do for shipping. Don’t change the Shipping Class.
Now there are only a couple more easy steps before your product should go live on your store.
Under the Product Data box that we have been adjusting settings in, you can set the Short Product Description. This is the short and brief descriptions your customers will see underneath the price next to the image. This should be just a few words or short sentence.
Short Product Description

That’s all you need to do.
Next if you have images that you would like to show then you can upload them in the two boxes:
Product Image – The green arrow is where you set the main product image. This image is the image shown on your storefront. And the first image they see large on the actual product screen. it should be the best example.
Product Gallery – When you have multiple images to show, then upload them in the Product Image Link

Make sure you set the Product Category. It’s your last step before your publish your new product
Add Product Category

If you already have a product category you want to use then just click the box next to it. To add a new category just click the link “Add new category”
Type in the name of the category as you want it to be shown. If you want it to be a child category under a head or parent category then in the Parent Category link that applies. To set a new parent category you need to type in the wordage of the parent category first. Hit enter and then repeat the steps to add a child category under it. For example in the above image. There is the parent category “Jewelry” and then the child categories of both “Cages – Plated” and then the “Cages – Sterling”. Categories help your customers navigate through your storefront smoothly, which actually increases sales and user friendliness so you never miss a sale.
